Why pay today when you could pay smarter? Online and offline businesses can offer their customers to pay in instalments. Recently started working for a client who has a chain of physical stores. On the stores, they offer this ability to their customer to pay in instalments using Openpay.
Openpay is an online credit facility for shopping online or in-store, and the interesting part is, it’s always interest-free.
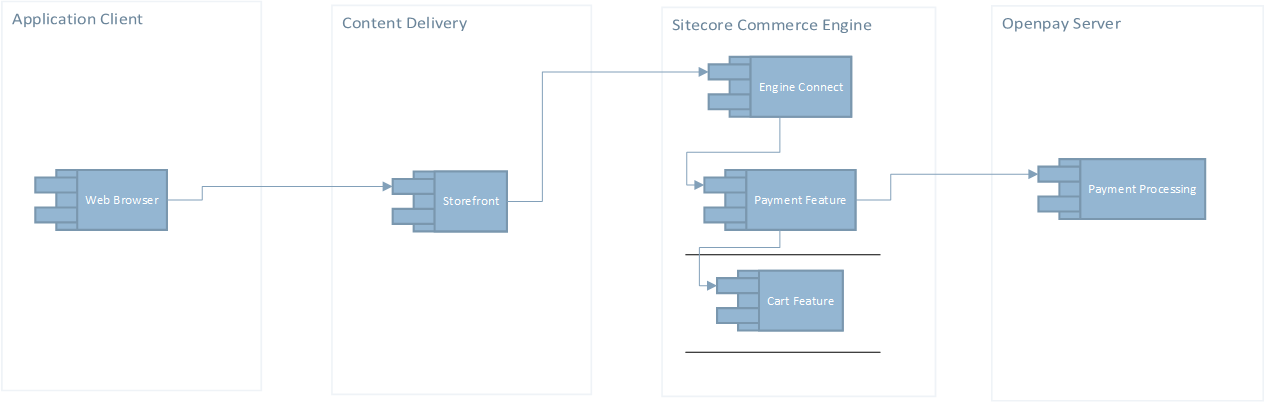
The retail website(atozshopping.com for argument sake) for online shopping is built using Sitecore and Sitecore Commerce(SXC). The customers could only pay through Creditcard and Paypal. We started working with integrating Openpay for online shopping.
This is how the high-level architecture would look like
Benefits:
- The customers will have the same experience on atozshopping as they get in a store
- There will be a potential increase in sales, as the Openpay customers can buy on atozshopping
Openpay eCommerce Flow:
The Openpay end to end flow with any retail website looks like

Integration Steps:
- Create Openpay merchant account
- Expose an API on Storefront to Create a new plan. Plan is a ubiquitous term in Openpay world. It indicates the number of instalments etc.
- Once we have the PlanId, create a URL to redirect customers to Openpay.
- The URL is used to redirect customers to Openpay where they can sign in and lodge the plan
- When customers lodge the plan, we redirect them back to the website to capture the amount.
- Expose another API to capture the amount. Openpay will call this API after a customer submits the plan.
- Once the amount is captured, we finalize the order.
New Plan API:
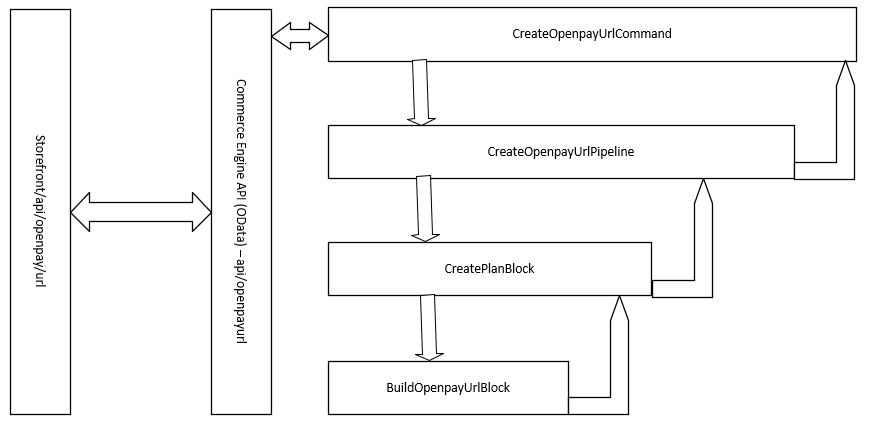
The new plan API would call an API endpoint in Sitecore commerce to get a create a new plan and it’s PlanId. The Sitecore commerce engine would API would call a command to run CreateOpenPayUrl pipeline. This pipeline has a block to call Openpay and create a plan.
CreatePlanBlock looks like.
Constant.ApiToken is an authentication token we get when we create a merchant account.
            var content = new NewOnlineOrder
            {
                JamAuthToken = Constant.ApiToken,
                PurchasePrice = 10,
                PlanCreationType = "Pending", //has to be Pending
                CallbackUrl = "www.atozshopping.com/capture", //Customer will be redirected back here
                BasketData = new List<BasketItem>
                {
                    new BasketItem
                    {
                        ItemName = "Shoes",
                        ItemCode = "SKU123",
                        ItemQty = 1,
                        ItemRetailCharge = 10
                    }
                },
                TenderTypes = new List<TenderType>
                {
                    new TenderType
                    {
                        Tender = "OpenPay",
                        Amount = 10
                    }
                }
            };
            var xmlContent = XmlConverter.ToXML(content);
            var client = new HttpClient();
            var response = await
            client.PostAsync(Constant.ApiUrl + "NewOnlineOrder", new StringContent(xmlContent, Encoding.UTF8, "text/xml"));

            if (response.IsSuccessStatusCode)
            {
                var finalResponse =
                    XmlConverter.XMLToObject<ResponseNewOnlineOrder>(await response.Content.ReadAsStringAsync());
                if (finalResponse.Status != 0)
                    throw new ApplicationException("Failed to create new order: " + finalResponse.Reason);

                return finalResponse;
            }

            throw new ApplicationException("Failed to create new order");
The ResponseNewLineOrder looks like
 public class ResponseNewOnlineOrder
    {
        public int Status { get; set; }
        public string Reason { get; set; }
        public long PlanID { get; set; }
        public string TransactionToken { get; set; }
    }
The response we get has a PlanId and TransactionToken. The CreateURLBlock would create a URL
            var policy = context.GetPolicy<OpenPayClientPolicy>(); //Policy has Openpay URL, where we redirect the users to
            var transactionToken = //TransactionToken we received in the previous step;
            var planId = //PlanId we received in previous step

            var urlBuilder = new StringBuilder();
            urlBuilder.Append(policy.HandoverUrl); //retailopenpay.com.au etc
            urlBuilder.Append("&TransactionToken=");
            urlBuilder.Append(WebUtility.UrlEncode(transactionToken));
            urlBuilder.Append("&JamPlanID=");
            urlBuilder.Append(WebUtility.UrlEncode(planId));
            return urlBuilder.ToString();
When we get the URL, we set it to an anchor tag(or button) on FE.
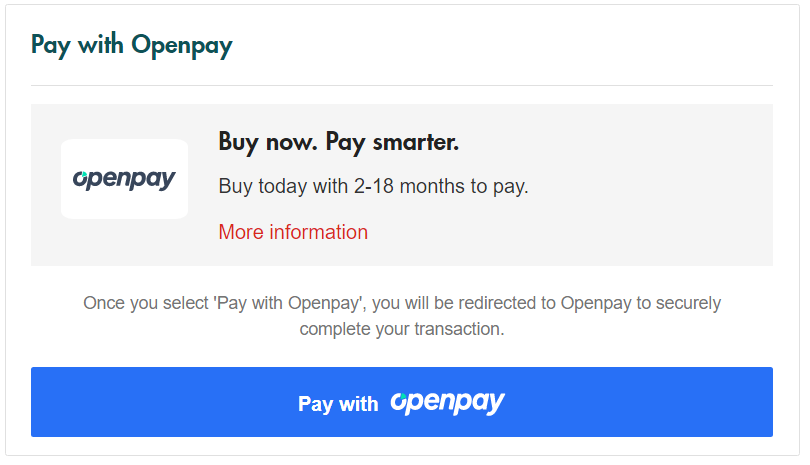
When customers click on that ‘Pay with Openpay’ link, it takes them to Openpay site. In Openpay,
- Customers login
- Choose a plan(4month or 6month etc)
- Submit Plan
Once this plan is submitted, the users get redirected back to our retail website. We specified the redirect uri(CallbackUrl) as part of the first call.
When customers land back on our website(hit our mvc endpoint), we call Commerce Engine to finalize the order. The customers are redirected to the order confirmation page. In case of an error, we redirect customers back to the payment page where they see the error message. We display a generic error to the customers, “We were unable to process Openpay transaction, please select any other payment option to proceed or retry later”.
Capture Amount API: This API is used to receive a response from Openpay when customers submit and complete a plan in Openpay. The API looks like
        public async Task<ActionResult> Capture(string status, string planid, string orderid)
        {
            if (status == "LODGED" || status == "SUCCESS")
            {
                // Call Commerce Engine to capture the amount here
            }
            else
            {
                // show error message
                ViewBag.Message = "Transaction status is: " + status;
            }

            return View();
        }
Just like CreateURLCommand and Pipelines we will have
- A Command to capture the amount
- The command will call a pipeline
- The pipeline has a block which calls Openpay to capture the payment.
CapturePaymentBlock looks like
        Process(long planid)
        {
            var content = new OnlineOrderCapturePayment
            {
                JamAuthToken = //Auth token from Commerce Policy,
                PlanID = //PlanId received in capture api
            };

            var xmlContent = XmlConverter.ToXML(content);
            var client = new HttpClient();
            var response = await client.PostAsync(Constant.ApiUrl + "OnlineOrderCapturePayment",
                new StringContent(xmlContent, Encoding.UTF8, "text/xml"));

            if (response.IsSuccessStatusCode)
            {
                var finalResponse = XmlConverter.XMLToObject<ResponseOnlineOrderCapturePayment>(await response.Content.ReadAsStringAsync());
                if (finalResponse.status != 0)
                    throw new ApplicationException("Failed to capture payment: " + finalResponse.reason);

                return finalResponse;
            }

            throw new ApplicationException("Failed to capture payment");
        }
Happy Coding!
Technical and Business considerations: There are few considerations, keep them in mind while going for Openpay
- Openpay has a transaction limit of 15,000 dollars.
- Openpay at the moment only provides a full redirect integration option. There is not a lightbox(modal) experience.